


If you are using Microsoft Office 365 for your business email and your emails are landing in the recipient’s spam folder, or getting rejected entirely by Gmail and other providers, the cause is almost always the same: your DNS records have not been configured correctly for email authentication.
This is not an Office 365 bug. It does not matter whether your domain is registered with GoDaddy, Crazy Domains, VentraIP, Cloudflare, Namecheap, or any other registrar. The problem and the fix are the same regardless of where your DNS is managed. We recently resolved this exact issue for one of our clients as part of our WordPress web design and SEO services, and this guide walks through exactly what the problem was and how we fixed it step by step.
What Is SPF and Why Does It Matter?
SPF stands for Sender Policy Framework. It is a DNS record that tells the world which mail servers are allowed to send email on behalf of your domain.
When you send an email from your Office 365 account, Gmail, Outlook, and other email providers check your domain’s DNS to see if Microsoft’s mail servers are authorised to send on your behalf. If there is no SPF record, or if it is wrong, the receiving server marks your email as suspicious.
The correct SPF record for Office 365 is:
Type: TXT
Name: @ (root domain)
Value: v=spf1 include:spf.protection.outlook.com -all
TTL: 1 hour
Common mistakes we see:
- The SPF record is missing entirely because it was never set up after moving to Office 365
- There are two SPF records on the same domain (you can only ever have one)
- The old hosting provider’s SPF record was left in place when the client moved to Office 365
- The
-allat the end was changed to?allwhich essentially means no enforcement
What Is DKIM and Why Does It Matter?
DKIM stands for DomainKeys Identified Mail. It adds a digital signature to every email you send, which proves the email genuinely came from your domain and was not tampered with in transit.
Without DKIM, even if your SPF record is correct, Gmail will often still flag your emails as suspicious. SPF tells receivers who is allowed to send. DKIM proves the email actually came from you.
For Office 365, DKIM is not enabled by default. You have to turn it on manually inside the Microsoft 365 security portal, and then add two CNAME records in your DNS zone, wherever that is managed.
The Exact Problem We Encountered
Our client was using Office 365 for their business email. Their domain was managed through a third party registrar. Emails sent to Gmail addresses were either landing in spam or not arriving at all.
This is the actual bounce message Gmail returned:
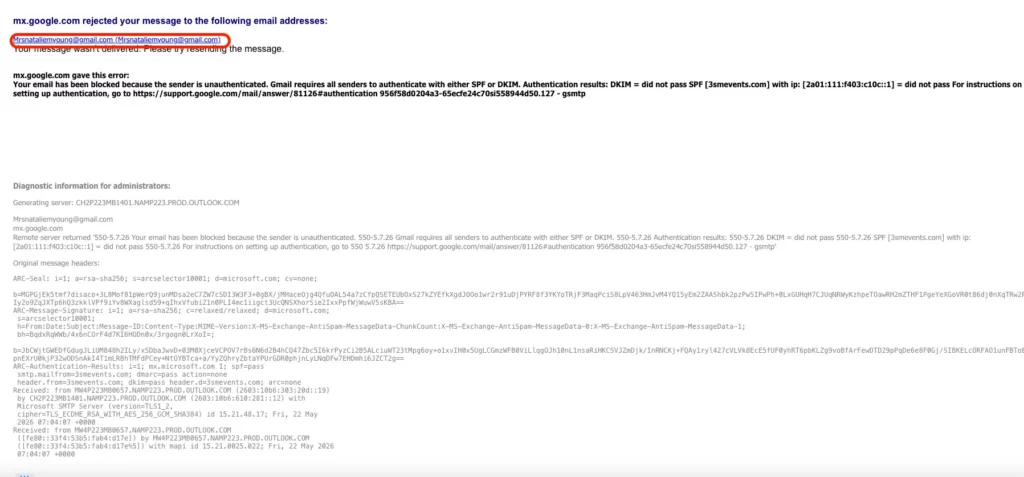
The exact rejection message Gmail returned. DKIM did not pass and SPF did not pass, so the email was blocked entirely.
When we checked their DNS at MXToolbox.com, we found:
- The SPF record was either missing or still pointed to their old web hosting server, not Microsoft
- DKIM had never been enabled in the Microsoft 365 admin portal
- No DMARC record existed
To Gmail and other providers, these emails looked like they could be coming from anywhere, which is exactly how spam and phishing emails look. This kind of issue can also affect your SEO and domain reputation over time.
How We Fixed It: Step by Step
Step 1: Fix the SPF Record in Your DNS
Log in to wherever your domain’s DNS is managed. This could be your domain registrar (GoDaddy, Crazy Domains, VentraIP, Namecheap etc.), your hosting provider’s control panel (cPanel, Plesk), or a standalone DNS service like Cloudflare.
Find the DNS zone for your domain and look for any existing TXT record starting with v=spf1. If there is one pointing to a web host or old server, edit it. If there is none, add a new one.
Type: TXT
Name: @
Value: v=spf1 include:spf.protection.outlook.com -all
TTL: 1 hour
If you have other services sending email on your behalf, such as a CRM, Mailchimp, or a website contact form, you need to include those in the same record too. For example:
v=spf1 include:spf.protection.outlook.com include:servers.mcsv.net -allNever create two separate SPF records. Combine everything into one single TXT record.
Step 2: Enable DKIM in Microsoft 365
This step is done inside Microsoft, not in your DNS provider.
- Go to security.microsoft.com
- Click Email and Collaboration in the left menu
- Click Policies and Rules
- Click Email Authentication Settings under the Rules section
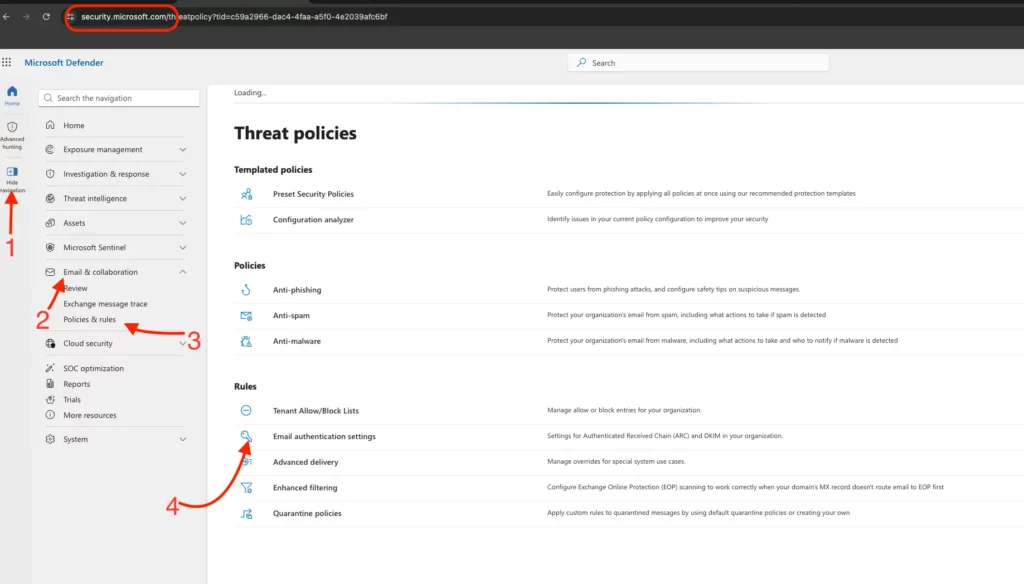
Follow the numbered steps: Email and Collaboration, then Policies and Rules, then Email Authentication Settings.
- Click the DKIM tab at the top
- Find your domain in the list and click on it
- Toggle Sign messages for this domain with DKIM signatures to ON
When you first try to enable DKIM, Microsoft will show an error. This is normal and expected. It means the required CNAME records have not been added to your DNS yet. Microsoft will give you two CNAME records that look like this:
Type: CNAME
Name: selector1._domainkey
Value: selector1-yourdomain-com._domainkey.yourtenant.onmicrosoft.com
Type: CNAME
Name: selector2._domainkey
Value: selector2-yourdomain-com._domainkey.yourtenant.onmicrosoft.com
The exact values will be specific to your Microsoft tenant. Copy them exactly as shown in the portal.
Step 3: Add the DKIM CNAME Records in Your DNS
Go back to your DNS provider and add both CNAME records. Enter only the subdomain part in the name field, for example selector1._domainkey. Most DNS providers automatically append your domain name, so do not add it again yourself or the record will be duplicated.
Wait 15 to 30 minutes for DNS to propagate, then go back to the Microsoft DKIM page and try enabling it again. Once the CNAME records are verified, your domain will show as Valid and Enabled.
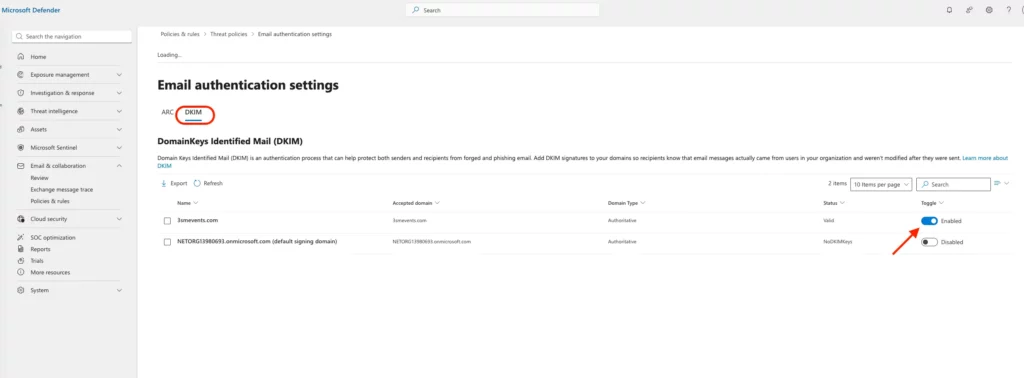
This is what success looks like. The domain shows Status: Valid and Toggle: Enabled. The onmicrosoft.com default signing domain can be left disabled, that is normal.
Step 4: Add a DMARC Record
While you are in your DNS settings, add a DMARC record as well. DMARC tells receiving mail servers what to do when an email fails SPF or DKIM checks.
Type: TXT
Name: _dmarc
Value: v=DMARC1; p=quarantine; rua=mailto:admin@yourdomain.com
TTL: 1 hour
Start with p=quarantine rather than p=reject. This sends suspicious emails to the spam folder rather than blocking them outright, which gives you time to confirm everything is working before applying the stricter setting.
How to Verify Everything Is Working
Once DNS has propagated (usually within an hour, sometimes up to 24 hours), test your configuration at mxtoolbox.com.
Run the following checks:
- MX Lookup – confirms your mail is routing through Microsoft
- SPF Record Lookup – should show your SPF record as valid
- DKIM Lookup – enter your domain and selector (selector1) to verify the signature
- DMARC Lookup – confirms your DMARC policy is in place
You can also send a test email to a Gmail address and check the email headers. In Gmail, click the three dots on the email and select Show original. You should see PASS next to SPF, DKIM, and DMARC.
Why This Happens So Often With Office 365
Microsoft 365 is the most widely used business email platform, but when you purchase a subscription directly from Microsoft and point your domain’s MX records over, only incoming email gets configured. The authentication records that protect your outgoing email, SPF, DKIM, and DMARC, are left for you to set up manually.
This is true regardless of which registrar or DNS provider you use. The Microsoft 365 setup wizard does prompt you to add DNS records, but many businesses skip steps or only action the MX record because that is the one that gets email flowing immediately. The authentication records feel optional until emails start bouncing or landing in spam.
The other common trigger is a domain or hosting migration. When a business moves from one web host to another, DNS records get copied across but the SPF record often still references the old server. Everything works fine until someone notices their emails are being flagged. If your site has recently been hacked or compromised, SPF and DKIM records are also among the first things to check and restore.
Need Help Setting This Up?
Uniweb has been setting up and troubleshooting email DNS for Australian businesses since 2011. If your Office 365 emails are landing in spam or getting rejected, we can diagnose and fix the issue quickly.
We work with all DNS providers including GoDaddy, Cloudflare, Crazy Domains, VentraIP, Namecheap, and cPanel-based hosting environments.
Get in Touch or Call, Text or Whatsapp us to get your email deliverability sorted.
